Effortlessly Import OST Files into Outlook
Applicable for: Microsoft 365, Outlook 2021, 2019, 2016, 2013, 2010, and 2007
Microsoft Outlook uses OST files to store mailbox data in offline or cached Exchange mode. These files allow users to access their emails, contacts, calendar entries, and other data even when not connected to the Exchange Server. However, OST files are associated with the specific Exchange account and cannot be directly imported into Outlook on another computer or for a different account.
In such cases, AxBlaze OST to PST converter becomes necessary. It enables users to convert OST files into PST format, which is a personal data file used by Outlook to store mailbox data. By converting OST files to PST, users can import the converted PST file into Outlook, thereby accessing their mailbox data on any computer or for a different email account.
Instant Solution
AxBlaze OST to PST Converter (Professional)
- Supports all OST files to convert.
- Converts inaccessible OST files.
- Converts all OST items to PST format.
- No file size limitation (Convert large-sized files easily).
It supports all Outlook versions - Microsoft 365, Outlook 2021, 2019, 2016, 2013, 2010, and previous versions.
Table of Contents
- Why an OST to PST converter is commonly used to import OST into Outlook?
- How to import OST files into Outlook using AxBlaze OST to PST Converter?
- How to import OST files into Outlook using manual method?
- How to import OST files into Outlook without Exchange Server?
Why an OST to PST converter is commonly used to import OST into Outlook?
Here are some reasons why an OST to PST converter is commonly used:
- Migration: When users need to migrate their email account from one Exchange server to another or switch to a different email platform, converting OST to PST allows them to transfer their mailbox data easily.
- Data Recovery: In situations where the Exchange server crashes, gets corrupted, or encounters synchronization issues, an OST to PST converter can help recover mailbox data from the OST file and restore it in Outlook.
- Accessing OST Data: If a user no longer has access to the original Exchange account but still has the OST file, converting it to PST allows them to access and view their old mailbox data in Outlook.
- Backup: Converting OST files to PST provides a convenient way to create backups of important mailbox data. PST files can be stored separately and accessed even if the original Exchange server is unavailable.
Overall, an OST to PST converter simplifies the process of importing OST files into Outlook, ensuring the seamless accessibility of mailbox data in various scenarios.
How to import OST files into Outlook using AxBlaze OST to PST Converter?
To import OST (Offline Storage Table) files into Outlook using AxBlaze OST to PST Converter, you can follow these general steps:
- Install AxBlaze OST to PST Converter: We suggest AxBlaze OST to PST converter that can convert OST files to PST format completely. Download and install it on your computer.
- Launch the OST to PST Converter: Open the installed software on your computer.
- Add the OST file: In the converter tool, locate the option to add the OST file you want to import. Click the "Open" button that allows you to browse and select the desired OST file.
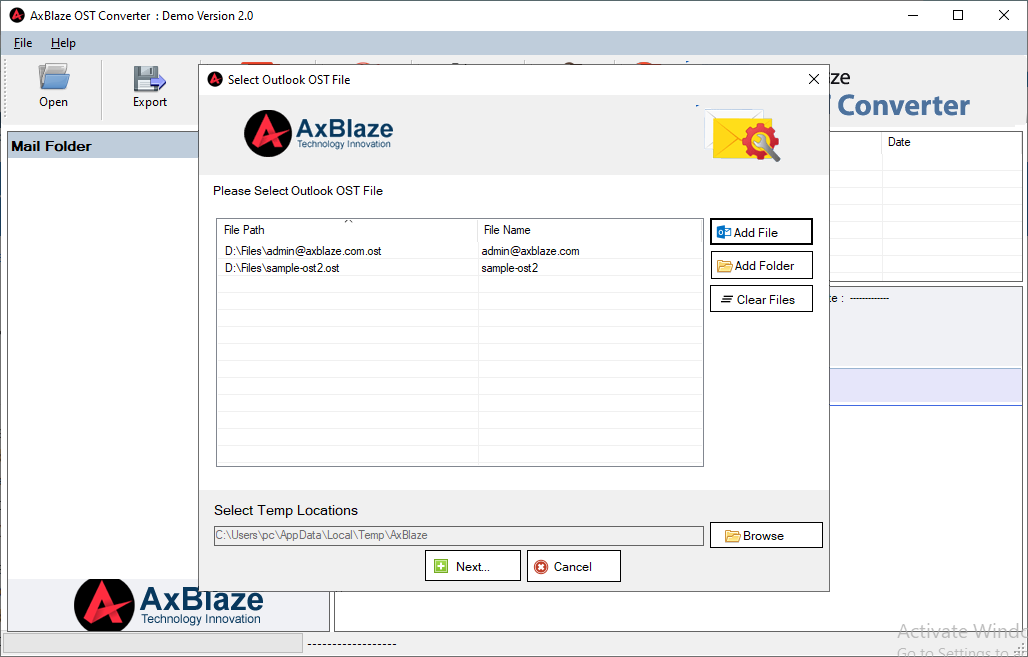
- Scan the OST file: After selecting the OST file, the converter will initiate a scanning process to analyze the contents of the file.
- Preview the scanned items: Once the scanning process is complete, the converter will display a preview of the scanned items from the OST file. This step allows you to review the content before proceeding.
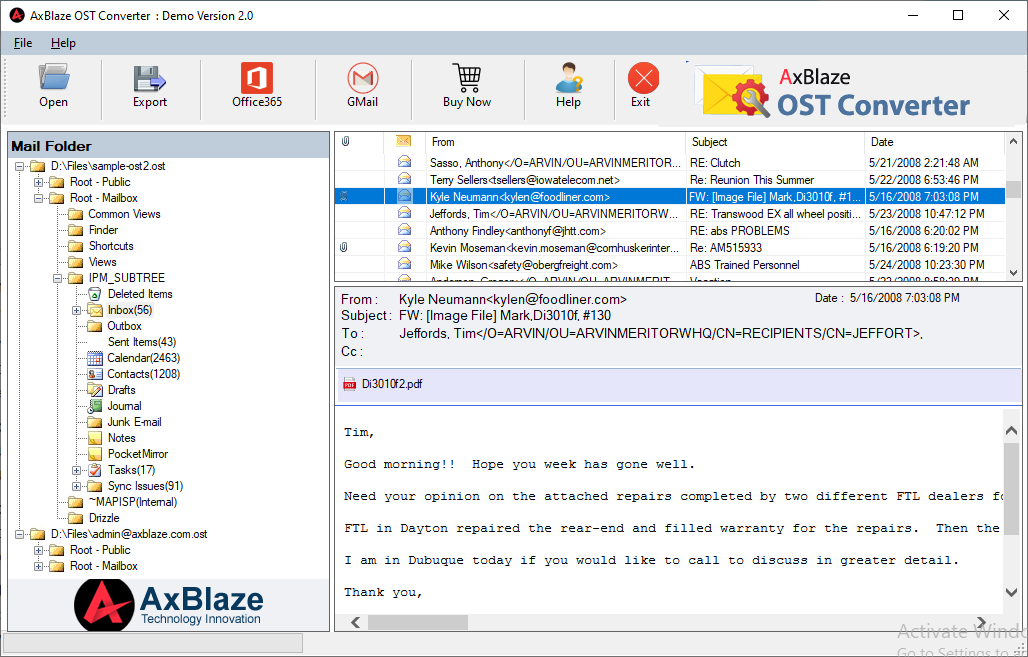
- Choose the items to convert: Select the items you want to import into Outlook. You can usually select individual emails, folders, contacts, calendars, or any other data included in the OST file.
- Specify the PST file format: In the converter tool, you will have the option to choose the output file format. Select PST (Personal Storage Table) as the target format since Outlook can directly import PST files.
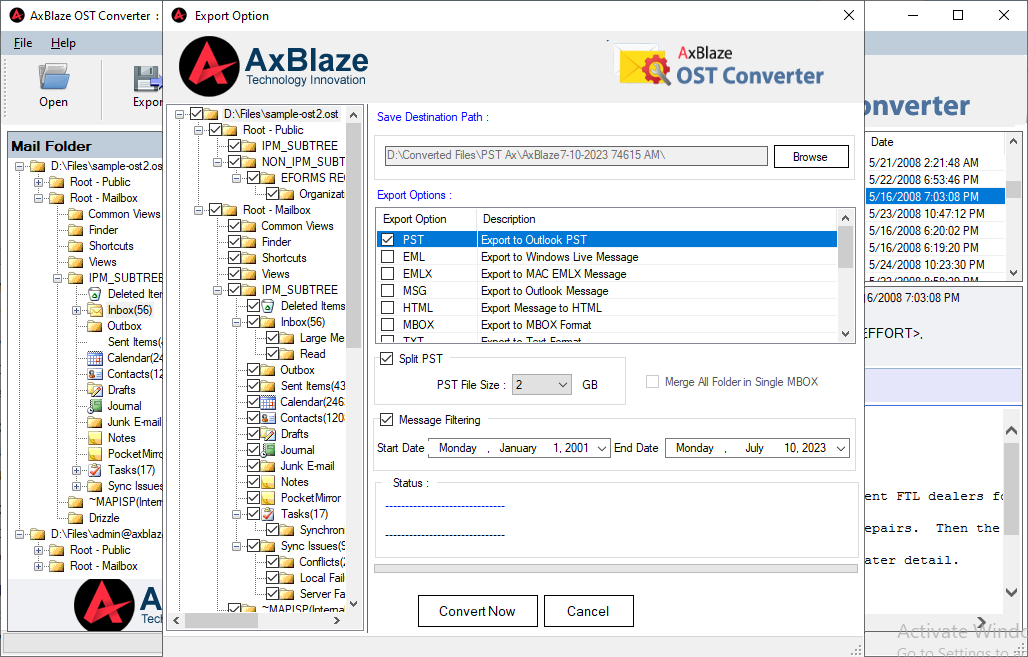
- Start the conversion process: Once you have selected the desired items and specified the output format, initiate the conversion process by clicking on "Convert Now" button.
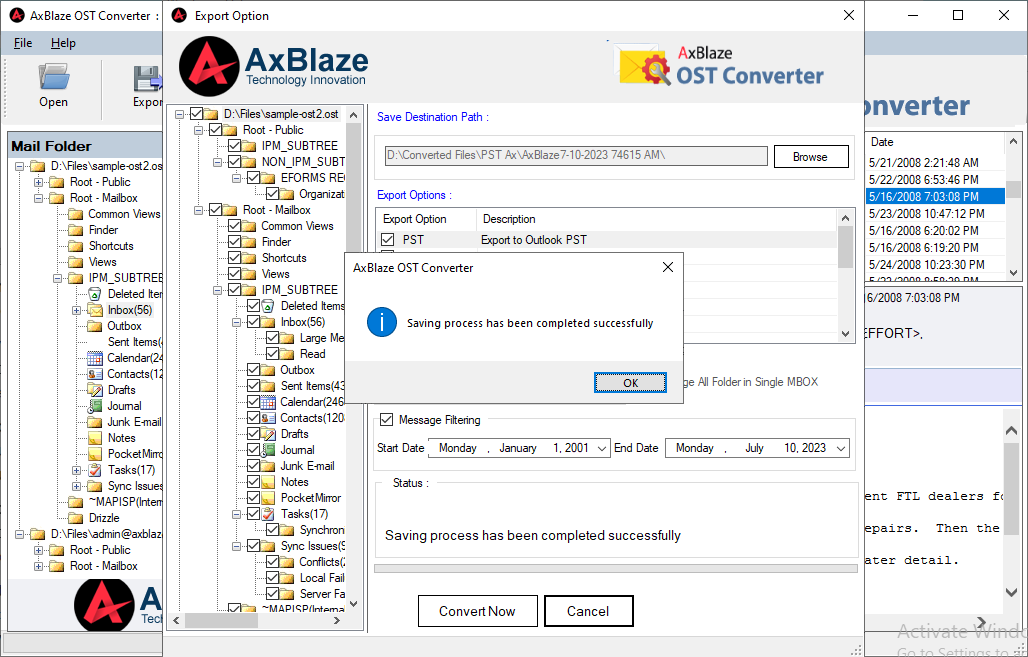
- Save the PST file: After the conversion is complete, the converter will generate a PST file containing the selected OST data. Choose a location on your computer where you want to save the PST file.
- Import the PST file into Outlook: Open Microsoft Outlook on your computer and navigate to the "File" menu. Select the "Open & Export" option, then choose "Import/Export." In the Import and Export Wizard, select "Import from another program or file" and click "Next." Choose "Outlook Data File (.pst)" and browse to select the converted PST file. Follow the prompts to complete the import process.

By following these steps, you can effectively import OST files into Outlook using AxBlaze OST to PST Converter. Remember to choose a reliable and trustworthy converter tool to ensure the integrity and safety of your data.
How to import OST files into Outlook using manual method?
To import OST (Offline Storage Table) files into Outlook, you can follow these steps:
- Open Microsoft Outlook on your computer.
- Click on the "File" tab or the "Open" option, depending on your Outlook version.
- In the "Open" menu, select "Import" or "Open & Export" (again, this may vary slightly depending on your Outlook version).
- Choose "Import from another program or file" from the list of options and click "Next."
- In the "Import a File" window, select "Outlook Data File (.pst)" and click "Next."
- Now, click on the "Browse" button to locate the OST file you want to import. By default, OST files are usually stored in a folder called "C:\Users
\AppData\Local\Microsoft\Outlook. " - Once you've located the OST file, select it and click "Open."
- In the "Import Outlook Data File" window, you have the option to specify how you want to handle duplicates. Choose the appropriate option and click "Next."
- Select the folder in Outlook where you want to import the OST file. You can choose an existing folder or create a new one. Click "Next" to proceed.
- If you want to import the OST file along with its subfolders, make sure to check the box that says "Include subfolders." You can also specify other options as needed. Once you're ready, click "Finish" to start the import process.
- Outlook will import the data from the OST file into the selected folder. The time required for the import process will depend on the size of the OST file.
- Once the import is complete, you can access the imported data in the chosen folder within Outlook.
It's important to note that importing an OST file into Outlook is typically used when you're trying to recover data from a damaged or orphaned OST file. OST files are used by Outlook when working in an Exchange environment, and normally, Outlook synchronizes with the Exchange server to retrieve the latest data. If you have an active connection to the Exchange server, there's usually no need to import an OST file manually.
How to import OST files into Outlook without Exchange Server?
To import an OST (Offline Storage Table) file into Outlook without an Exchange server, you can follow these steps:
- Convert OST to PST: Since Outlook does not support directly importing OST files, you'll need to convert the OST file to PST (Personal Storage Table) format. AxBlaze OST to PST converter is available for this conversion. This tool extract data from the OST file and create a new PST file for Outlook.
- Create a new Outlook profile: After converting the OST file to PST, you need to create a new Outlook profile to import the PST file. Here's how to do it:
- Close Outlook if it's open.
- Go to the Control Panel on your computer.
- Search for "Mail" or "Mail (32-bit)" and open the Mail Setup dialog.
- Click on the "Show Profiles" button.
- Click on the "Add" button to create a new profile.
- Provide a name for the new profile and follow the on-screen instructions to set it up.
- Import the PST file: Once you have the new Outlook profile set up, you can import the converted PST file.
- Open Outlook using the newly created profile.
- Go to "File" and select "Open & Export" or "Open" (depending on your Outlook version).
- Choose "Import/Export" from the options.
- In the Import and Export Wizard, select "Import from another program or file" and click "Next".
- Choose "Outlook Data File (.pst)" and click "Next".
- Click on the "Browse" button and locate the converted PST file.
- Choose the desired options for importing and click "Next".
- Select the folder(s) you want to import from the PST file and click "Finish".
- Access imported data: Once the import process is complete, you can access the imported data from the OST file in the newly created Outlook profile. The imported data will be available in the corresponding folders within Outlook.
Note: It's important to have a backup of your original OST file before attempting the conversion, as the process involves manipulating the data. Additionally, using AxBlaze for OST to PST conversion is the best way to import OST into Outlook, so ensure you choose a reliable and trustworthy tool/service like AxBlaze.

By Franka Sommer
In our content media team, a group of passionate geeks and tech researchers work tirelessly to provide you with the most cutting-edge industry knowledge and updates. Stay connected with us to unravel the answers to countless questions like "WHAT? HOW? WHY? WHEN?" and more.